
My first pieces built from my custom 3-inch ‘cloud’ extruder die were fired, and here are the results. I’m very pleased. I used ’nature’ inspired glaze colors since the shape of the extrusion was reminiscent of stems or tree trunks.


My first pieces built from my custom 3-inch ‘cloud’ extruder die were fired, and here are the results. I’m very pleased. I used ’nature’ inspired glaze colors since the shape of the extrusion was reminiscent of stems or tree trunks.
I decided to be more ambitious with my custom dies. I wanted to make some custom hollow dies for my 3-inch wall-mounted extruder from Endless Mountain Clays.
Attempt number one was a pair of all-in-one hollow dies that I printed up at Shapeways.com, in the same plastic that I used for the dies in my Scott Creek handheld extruder. The first of these immediately snapped in half like a potato chip its first time. I didn’t even bother to try the second die. Very poor design on my part, and clearly the wrong printing medium.
Fail.

I modeled a second attempt – a reusable bridge and a single cloud-shaped hollow die that would attach to the bridge with a M5 20mm screw. This die I had printed at a local 3D shop – Diversified Manufacturing in Middletown, CT. I wondered if the bridge would be best printed in metal to withstand the pressure, but Andrew at Diversified recommended trying a carbon-fiber material instead, since that was much cheaper. So we went that route.
This second attempt looked great, but I made a mistake – somehow, I accidentally changed the outside diameter of the bridge to 70mm instead of 65mm, and so it didn’t even fit into the extruder. Sigh. And on closer inspection of the bridge, I decided that the center support needed to be a wider diameter, enough to use a 1/4 hex bolt to hold on the die, rather than the M5 screw that I originally modeled. I felt that the screw would eventually just strip under the pressure.
So, fail.

Back to the drawing board, literally. New die, new bridge, and double-checked all measurements.
A few days later I picked up version 3 of my hollow die and bridge, stopped by Lowe’s to get the bolt and hex nut needed, and tried them out with some nice soft, recently recycled clay.
SUCCESS!


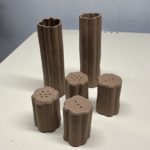
The walls of my die are quite thin, so I used a heat gun to stiffen up the extrusions before wiring them off the extruder. And my ‘cloud’ design turned out to look organic when extruded – reminiscent of a plant stem. I created a couple of simple vases, and two pairs of salt and pepper shakers from my first extrusions.


It will be interesting to see how well the die will holds up over time – I think that I will always be careful to use soft clay. Now, on to dies and bridges for 4- and 5-inch extruders!

20 years ago, inspired by ‘The Extruder Book’ by Daryl Baird, I tried to make some custom extruder dies, with very limited success. My best attempt was a hollow, rounded triangular die. If I remember correctly, I made it from a thick white plastic cutting board material, and the center piece was held in place with rather wobbly U-bolts. The hollow shape that was produced had disappointingly thick, uneven walls. I made a few soap dispensers from the extrusions, but I quickly became frustrated and disenchanted with them, and returned to working on the wheel.
Nowadays, I do as much hand building as I do wheel work, so the lure of the extruder returned. I looked online for extruder dies but found myself generally disappointed with the selection. Most commercial dies were simple shapes, and the walls of hollow shapes were thicker than I desired for my work.
It was time to revisit making my own dies! In the 20 years since I last attempted it, technology and software had significantly advanced. Many 3D modeling applications were available, some of them free. 3D printers had become commonplace. And I had more resources at my disposal, both personally and at the pottery.
I used Shapr3D, 3D modeling app for the iPad, since we already had a subscription. After a little practice, I modeled a few simple dies for my 2-inch Scott Creek ‘Super Duper Clay Extruder’. I exported them to .stl, uploaded them to Shapeways.com, ordered them printed in their Multi Jet Fusion Plastic PA12, and crossed my fingers.
They worked! Naturally I found that a few of the designs work out as I had hoped, but I was off and running. I’ve modeled and printed maybe a dozen custom 2-in dies over the past year or so. I use them as edgings, feet, handles, and coils.
The cost isn’t unreasonable (around $8 per die), and it enables me to get some effects on my pottery that I wouldn’t be able to get otherwise. The material used for these small dies proved to be quite durable; I have yet to break one.


For many years, I didn’t recycle my clay scraps. The process seemed arduous and messy, and the results less than satisfactory. Since I belong to a co-op, I just donated all of my scraps to their bucket, and they recycled it, pugged and bagged it, and re-sold it to students.
A few years ago my husband took some pottery classes. As he learned, he generated a lot of waste clay, and he developed a successful process to reclaim our scraps. I’m sure that he found it on the internet somewhere, but I don’t know where.
You will need – at least two 5-gallon buckets with lids, and an extra lid with a hole poked in it. Also, a drill with a paint mixer attachment, and some plaster forms of some kind. I use some plaster bowls – over the years I’ve accumulated eight of them.
Collect your clay scraps. I don’t save every bit of clay waste. In particular, I don’t save the slop that is left over when I throw – it’s messy and a hassle – that goes into the pottery’s scrap bucket. I save trimmings, and all the little leftover pieces from my hand built work, and any greenware that I decide to trash. Collect the scraps in a five gallon bucket. Larger pieces I crunch up into smaller bits. Since I work in porcelain, B-mix and brown clay, I separate my scraps and trimmings by color. Brown into one bucket, and porcelain and B-mix in the other.
If you do save your wet throwing scraps, make sure that they are completely dry before you put it in the bucket. Wet clay lumps will not slake down evenly and will cause lumps in the final product.

When a bucket is around 2/3 full of COMPLETELY DRY scraps – put water in the bucket, completely submerging them. There should be at least two inches of water above the scrap level. Since the buckets are quite heavy after the water is added, I typically bring them up into the garage, add water from the hose, and then push them into a corner. Don’t let them freeze, though.
Let the watered scraps sit and slake, for at least a week. In my case, they usually sit for a couple of months because I forget about it.
Using a drill with a paint-mixing attachment, blend the slaked clay vigorously for several minutes. This step is messy. Do it outside. Wearing old clothes. This is where you use the extra five-gallon bucket lid with a hole punched in the middle – running the mixer attachment through this hole helps cut down on the splashing. The longer you mix, the smoother the resulting clay will be. Add water as needed to allow the mixer to really do its work, you want to see good circulation as you are mixing. The consistency should be nice and smooth.
When it is throughly mixed, set it aside again and let it sit. Again, I usually forget about for a couple months. As it sits, the clay will settle into a dense layer on the bottom, with a clear layer of water on the top.

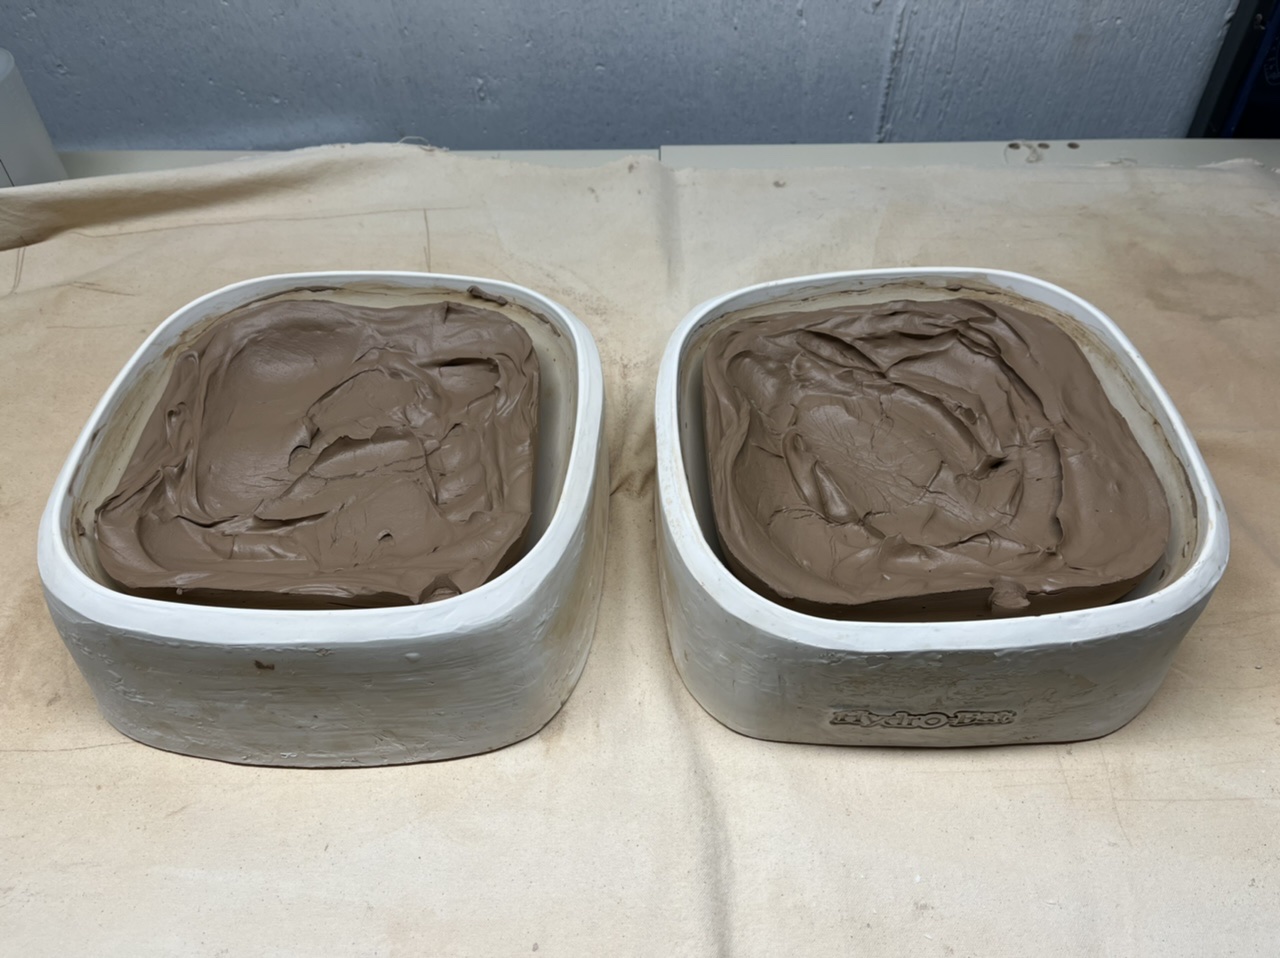
When you are ready to process the recycled clay, remove the extra water carefully with a scoop or a sponge. Scoop the sloppy clay out into plaster bowls. I have eight bowls – you can buy them pre-made (yes, a little expensive, but considering the money I save on clay, well worth it) or you can make some bowl-shapes yourself out of pottery plaster.

Let the clay sit in the plaster form. At this point you need to check it daily to make sure it doesn’t over-dry. The edges will pull back from the plaster. The top will start to feel a bit crunchy, but the clay will still be soft in the middle. It will take a little practice to recognize when your clay has gotten to the consistency you prefer. In my basement, it usually takes around a week.

When the clay is dry enough, turn it out of the bowl, divide it, and wedge it thoroughly to blend the harder outer surface with the softer interior. I find that the texture is optimal when the clay seems just a tad too dry on the outside – the inside will still be too soft, and wedged it will be perfect.
It’s tempting to wait until you have a VERY FULL bucket of scraps to slake down, but don’t. You need room in the bucket for lots of extra water so the mixer can really move things around. In the pictures posted here, I overfilled the buckets. This made it difficult to mix (the white one wound up a bit lumpy), and they were VERY heavy and hard to move.
Use a sponge to wipe extra clay off the plaster forms, let them dry completely for a few days, and you are ready for the next batch.
Using this process I usually only have to work on my recycling three or four times a year. The rest of the time it just sits. Each plaster bowl yields about 8 pounds of clay. I store the wedged clay in clay bags that I have washed out.
Some people do not like to use plaster in their studios, with good reason. A tiny bit of plaster in your clay can cause huge problems with your work, popping out and ruining the piece when it fires. Before I use my molds, I clean them carefully with a sponge and water, and once they are dry again I wipe them out with a dry towel before scooping my wet clay in. Never scrape clay out of the molds – turn the form over and let the clay fall out naturally. Any clay that sticks to the mold should just be washed off. Be careful moving the molds around so that they don’t drop any plaster dust or particles on each other.